ActiveSync & Microsoft Bluetooth Wireless Transceiver
By
Raj Pillai, Copyright
2003-2004
Version 1.01 Revised 25/10/2004
[an error occurred while processing this directive]
The following document will help you to setup Bluetooth synchronization using ActiveSync 3.7.1 with Microsoft Bluetooth Wireless Transceiver. This article provides an illustrated, step-by-step procedure to get it working. This article can be referred for other Bluetooth software as well but the steps might vary a little to setup the virtual COM port. The crucial step while setting up a Bluetooth connection is to ensure that the COM port assigned is not greater than COM 9. The reason being - ActiveSync does not support higher COM ports. For more information on how you can reassign the COM ports, please refer the article.
My sincere thanks to Chris De Herrera for allowing me to host my articles on Pocket PC FAQ (formerly CEWindows.NET).
Introduction:
Finally, it is possible to synchronize your Pocket PC with Microsoft's Wireless Transceiver shipped with their Optical Wireless IntelliMouse Explorer and Wireless Optical Desktop for Bluetooth. This was not possible earlier due to lack of support for the serial profile. The illustrations below gives a detailed instruction of how I have setup my iPAQ 4155 for Bluetooth synchronization.
How to set it up:
- Step 1: Install Service Pack 2 for Windows XP
First, you need to download the Service Pack 2 (SP2) for Windows XP since this has various enhancements for Bluetooth standard. You can install it by visiting the following Windows update Web site ---
http://v5.windowsupdate.microsoft.com/v5consumer/default.aspx
After installation, you need to restart the computer.
- Step 2: Setting up the Bluetooth on the Desktop and the Pocket PC
Assuming you have already installed and established a partnership with your Desktop computer, Clicking File -> Connection Settings will show the following as your COM port settings. Or else it is recommended that you connect your Pocket PC either using serial or USB connection and establish a partnership before proceeding to establish a Bluetooth connection.

You will first need to Add the Pocket PC device. This can be down by right-clicking the Bluetooth icon running in the system tray or else Click on Start -> Control Panel -> Printer & Other Hardware and click the Bluetooth Devices and click "Add a Bluetooth Device":

The following screen will appear. Now you need to turn on the Bluetooth signal on your Pocket PC, check the option on the screen below and click the Next button:

The Wizard will search for the device and display it as shown below:

Select the device and click next and the following screen will appear. If you want to setup a passkey select the option and enter the desired key:

In this example, I have set the passkey as "111" and clicked the next button:

At this instance, you need to check your Pocket PC and enter the passkey. This needs to be done quickly or else you will encounter the following screen. If you do, simply go back and perform the steps once again:

After you enter the passkey on your Pocket PC, the computer will detect the Pocket PC. You will notice a bubble on your task bar as shown below followed by the Wizard confirmation of a successful connection being established:


Next step is to check the COM ports that it has got assigned:


Click the COM Ports tab and note the COM ports that it is using. If the COM ports used by the Pocket PC are higher then COM port 9, then you will need to assign it manually since ActiveSync will support COM ports between 1 and 9 only:

To re-assign the COM port, go to the Device Manager and click and expand the Ports (COM & LPT) listing as shown below:

To assign a COM port number, you will need to rearrange the COM ports whereby the Bluetooth virtual COM port is assigned a number in the supported range. You might need to uninstall some serial hardware or software to be able to do so. Refer to the following MSKB article to remove all false virtual COM ports via Device Manager ---
http://support.microsoft.com/?id=315539
Once it displays all the COM ports, you can proceed to uninstall the blocked ports. The other way is to manually set the port number but this might interfere with the functioning if the COM port is being used by another device. If you are sure the COM port is not being used by the other device, then you can set it up manually as explained in the following screen.The, COM port 26 (Incoming) is going to be assigned COM port 8. Right-click the Device Manager entry for COM26 and click Properties and select the Port Settings tab.

Next click the Advanced button and select the COM Port Number that you need to assign from the list box at the end of the dialog:

Click Yes and proceed to do the same for the other COM port. In our example (COM25 is to be set as COM 6).

After this is done, Click Action -> Scan for Hardware changes on your Device Manager window and you will see the COM ports reflecting the changes you have made. Next go to the COM port listing again in the Bluetooth Devices list as explained earlier and verify that the COM ports are reflecting the changes.

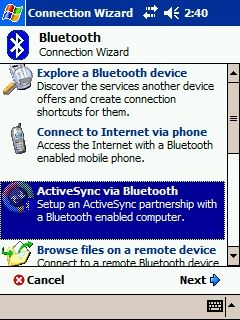
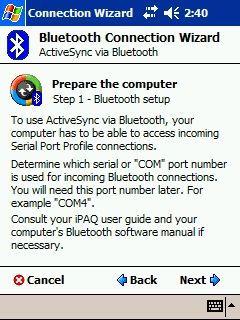
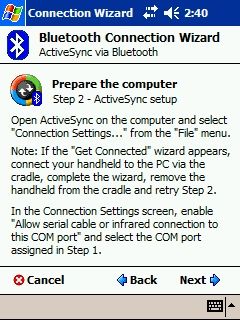
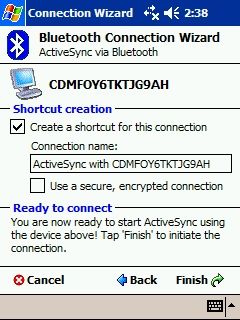
Once this is done, go to your Pocket PC and start the Bluetooth Manager. Tap New and select the "ActiveSync via Bluetooth" option. Follow the instructions on the screen and once your computer is listed, select the device and create a short-cut icon for the connection. Next time you want to connect using Bluetooth, all you have to do is tap the short-cut icon and choose Connect.

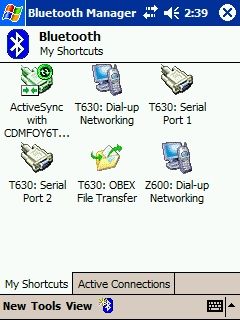
On your computer, click on the Devices tab on the same dialog as shown below and select the Pocket PC and click Properties and then click the Services tab and ensure the Serial port service is checked.


Open ActiveSync on your Desktop and attempt to connect via your Pocket PC short-cut. You should have a successful connection. Enjoy synchronizing via Bluetooth with your Microsoft Bluetooth Transceiver !!!
Read other articles by Raj Pillai
Discuss your Handheld PC, Palm-size PC or Pocket PC needs at Pocket PC FAQ Forums.
[an error occurred while processing this directive]