|
|
Chris De Herrera's Windows CE Website |
|---|---|
About |
|


| By Chris De Herrera Copyright 1998-2007 All Rights Reserved A member of the Talksites Family of Websites Windows and
Windows CE are trademarks of
Microsoft All Trademarks are owned |
My Experiences with Installing
Exchange 2003
By Chris De Herrera,
Copyright 2006
Version 1.02 Created 1/30/2006, Revised 2/8/06
[an error occurred while processing this directive]
Setup
Setting up SBS went smoothly. It�s a straightforward installation. I just followed the prompts. After SBS was installed, I installed Exchange 2003. I then installed Service Pack 1 for SBS and Service Pack 2 for Exchange 2003. I then configured the internet connection and domain name I wanted to use. I already setup the DNS entries pointing to my SBS server so it was live once I finished the configuration.
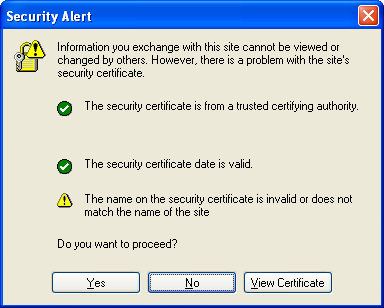
After the setup was complete, I setup my first account and selected the profile which allowed the user to have mobile access. I was then able to login via the web to the SBS server and access my e-mail using SSL. However the default digital certificate required me to answer a prompt about the certificate not being issued by a supported certificate issuer.
Configuring AirSync
The default installation of Exchange 2003 allows users to sync with Exchange from their Pocket PC or Smartphone if you have chosen the options for their account to allow them to sync. However if you did not purchase and install a digital certificate from a trusted certifying authority, you will need to install the digital certificate on the Pocket PC or Smartphone. By default Exchange 2003 sets up a locally issued digital certificate to encrypt the data sent via the web.
Installing a Locally Issued Digital Certificate
There are multiple ways to extract the digital certificate from the web server that is providing web access to Exchange. You can contact the network administrator and ask him or her to extract the .cer file so you can install it on your device. If you don� have access to the server you can still extract the certificate using a Windows XP PC by visiting Outlook Web access and right clicking a blank portion of the web page. Then click on the Properties. Then click on Certificates, click on the Details tab and then click on the button to Copy to File. Then follow the prompts to extract the file. Make sure you select the DER format for the certificate. This is the only format that Windows Mobile 5.0 and Windows Mobile 2003 / Second Edition devices support . The digital certificate formats of base64 and pks7 are no supported. To install the certificate, copy the certificate to the device using ActiveSync � File Explorer and place it in the My Documents folder or copy it to a SD card and insert it in the device. Once you have the certificate copied to the device, you need to use File Explorer to navigate to the folder that contains the certificate. Then click on the certificate to install it. The Pocket PC or Smartphone will ask you if you want to install it. You must answer Yes to install it.
Setting up Airsync on the Device
To setup Airsync on your device, click on Start � ActiveSync to open ActiveSync. For the Pocket PC click on Tools � Options � and select the Server. Then follow the prompts to setup the connection to the server. For the username you may have to enter your domain name\user name to connect. Also make sure that the option to use SSL is checked to ensure that your data is encrypted.
For the Smartphone click on Start � ActiveSync. Then click on Menu and then Configure Server. Then follow the prompts to setup the connection to the server. For the username you may have to enter your domain name\user name to connect. Also make sure that the option to use SSL is checked to ensure that your data is encrypted.
In addition to configuring ActiveSync, you need to have access to an internet connection. For mobile phone users you will need to subscribe to data services such as EVDO, 1xRTT , GPRS, or EDGE to allow you to connect to the internet. In addition you should also have unlimited SMS messages setup on your account as well. This way when the Exchange server sends you an SMS message you won�t be billed for excessive use.
Synchronizing
Once you have setup your device, you can sync by clicking on ActiveSync and then clicking on Sync. For Windows Mobile 5.0 devices the first synchronization will be significantly slower. However subsequent synchronizations will occur faster.
Installing Exchange Server ActiveSync Web Administration
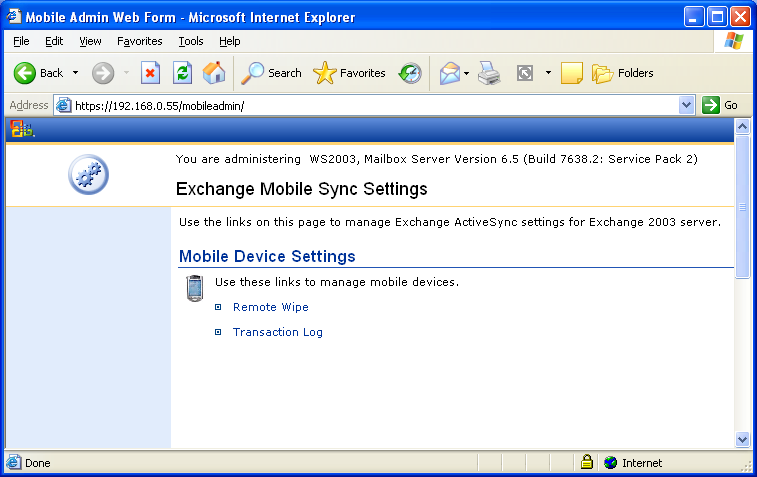
Even though you installed Service Pack 2 for Exchange, you need to install Exchange Server ActiveSync Web Administration (http://www.microsoft.com/downloads/details.aspx?FamilyID=e6851d23-d145-4dbf-a2cc-e0b4c6301453&DisplayLang=en ) to get the benefits of being able to remote erase a device. Once Exchange Server ActiveSync Web Administration is installed, you can access it using your host name with the subdirectory of mobileadmin (http://host.com/mobileadmin/ externally or http://host/mobileadmin internally) from within your network or externally. You will be connected to an SSL secured web page that will prompt you for your username and password. Only network administrators are allowed access to this web page by default.
You will see a screen that looks like:
The remote wipe screen looks like:
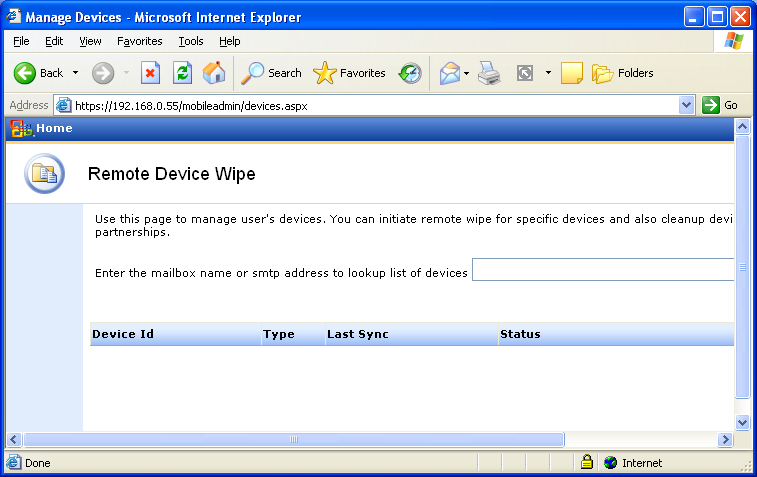
This is where you can select a device to erase.
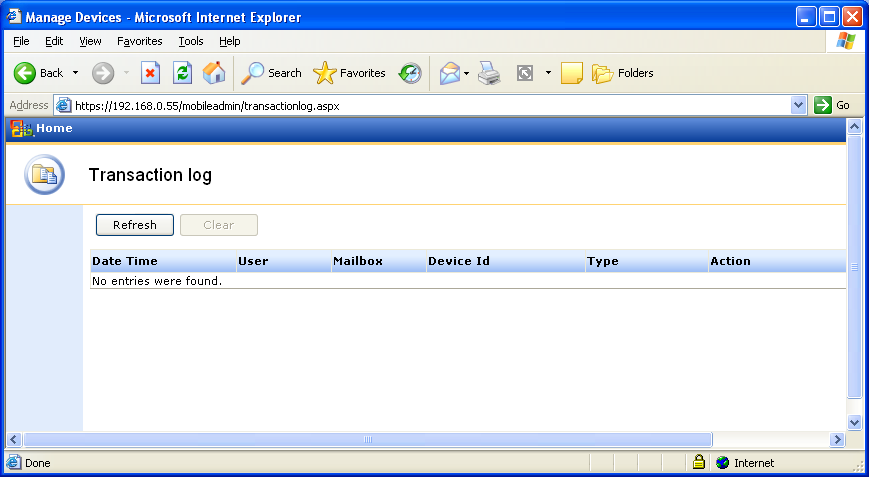
This is the transaction log screen.
Messaging and Security Feature Pack
The Messaging and Security Feature Pack is only for Windows Mobile 5.0 devices. It is part of Exchange 2003 Service Pack 2 and Exchange Server ActiveSync Web Administration which are both installed on the server. In addition each device you sync with Exchange will need to have AKU2 installed. This is going to be a rom update from your OEM. You can tell if it is installed on a Pocket PC by clicking on Start � Settings � System � About. For the Smartphone click on Start � Settings � More � About. The build number will have a .2 indicating that AKU2 is installed. For more information on the benefits of the Messaging and Security Feature Pack visit http://www.microsoft.com/windowsmobile/business/5/default.mspx
You can see the settings for the Exchange administrator by launching the Exchange System Manager, clicking on the Global Settings. Then click on the Mobile Services and Right Click and select the Properties. You will see the screen below.

On this screen you can see the option to enable up-to-date notifications via SMTP (new with Exchange SP2 and WM5 AKU2). Also, you will want to check the box for Enable unsupported devices if you are using older devices that cannot support the Device Security.
The Device Security screen is below:
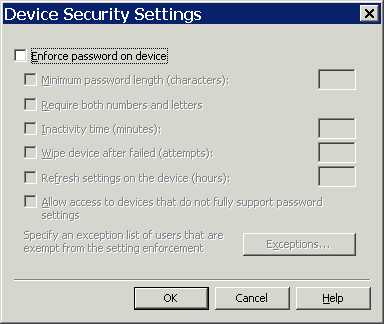
If you enable this screen and have devices that do not have passwords, the users will see the error 8501004 error. You may need to uncheck these options until the users have implemented password security.
Troubleshooting Exchange AirSync
Here are some tools to help you troubleshoot problems with Exchange Airsync. A list of Microsoft Server ActiveSync Error Codes are published at http://blog.flaphead.dns2go.com/archive/2005/11/21/3202.aspx by Paul Flaherty. Also, you will want to search the Microsoft Knowledge Base for additional updates on Exchange ActiveSync - http://support.microsoft.com/search/default.aspx?qu=exchange+activesync. Also I have a list of issues and their resolution at ActiveSync Troubleshooting Guide - Outlook Mobile Access (OMA) / Exchange ActiveSync
Exchange ActiveSync Ports
Exchange ActiveSync uses port 80 and port 443 (with SSL) to allow you to sync with your PC. There is no option in ActiveSync on the Pocket PC or Smartphone to change the ports that are used to sync.
Conclusion
Overall I am really pleased with being able to sync directly to Exchange 2003 to pickup my e-mail and keep my calendar and contacts. Clearly it makes keeping up to date easier than using POP3 for e-mail and ActiveSync with Outlook plus I can sync multiple devices at the same time.
[an error occurred while processing this directive]